Are you tired of throwing away spoiled produce? Have you ever wanted to preserve your favorite fruits, vegetables, meats, and herbs in a convenient and healthy way? Do you want to save money on your next camping or backpacking trip while eating delicious nutrient-rich snacks and meals? Look no further than a food dehydrator! In this article we’ll show you how a food dehydrator works and answer some common questions about dehydrating.

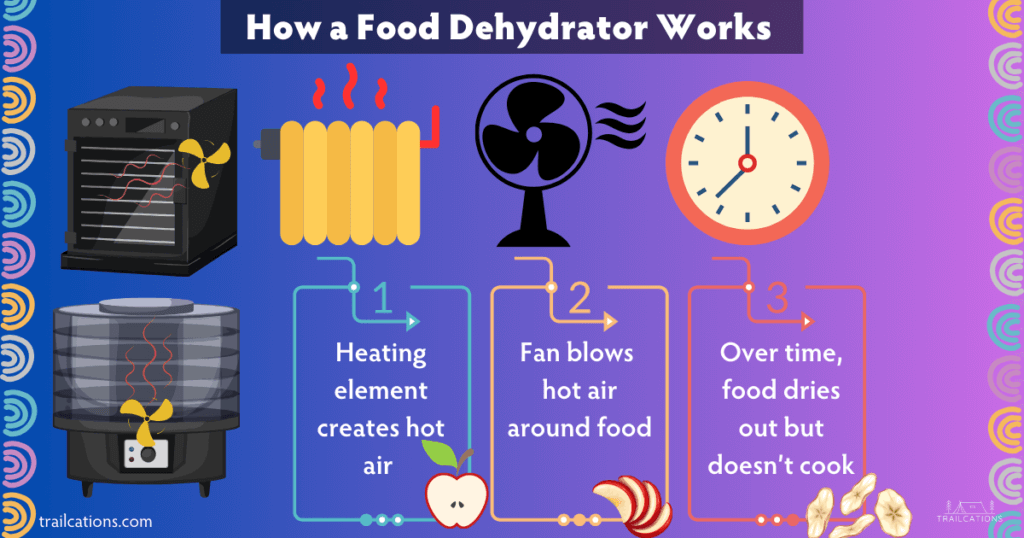
A food dehydrator is a small kitchen appliance that can help reduce food waste by removing moisture from fruits, vegetables, meats and more, preserving them for long term storage. How a food dehydrator works is by using a heating element and a fan to circulate hot air around the food.
As hot air passes over the food, it absorbs moisture and carries it away, drying out the food and preserving it. A dehydrator is perfect for making healthy snacks, drying entire meals, preserving seasonal produce and reducing food waste.
But How Does a Food Dehydrator Work? Let’s Break it Down.
Removing Moisture
First, let’s talk about why removing moisture from a food is important. Bacteria, enzymes and mold thrive in moist environments which is one of the reasons why fresh food spoils quickly.
However, if you can dry out a food enough, you can stop bacteria from reproducing and essentially halt the decomposition process. Bacteria and mold can’t grow without water. Enzymes can’t decompose and spoil food in the absence of moisture.
By removing moisture, a food dehydrator slows down the spoiling process and extends the shelf life of a food from a few days to a few months, years or even decades! How a food dehydrator works is a little bit like using a convection oven but with lower temperatures that preserve the food, not cook it.

Heat + Air Flow + Time = Dehydrated Deliciousness
How does a food dehydrator remove moisture from a food?
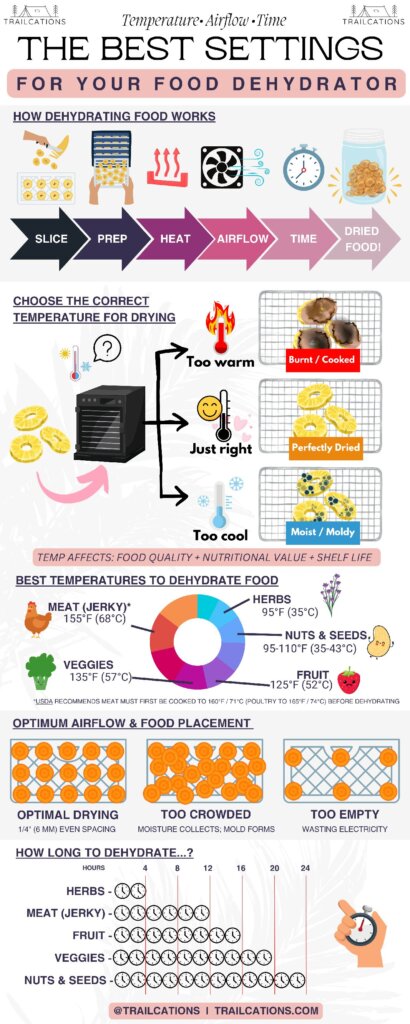
A dehydrator uses low heat (95-165℉ / 35-74℃) and a fan to circulate warm, dry air around the food. As the hot air passes over the food, moisture inside the food evaporates into water vapor. In turn, the fan blows the moisture heavy air away.
Over several hours the fresh food dries out, leaving behind an ingredient with only 5% to 15% moisture remaining. It’s pretty impressive as some fruits and vegetables contain up to 95% water!
Factors Affecting Drying Times
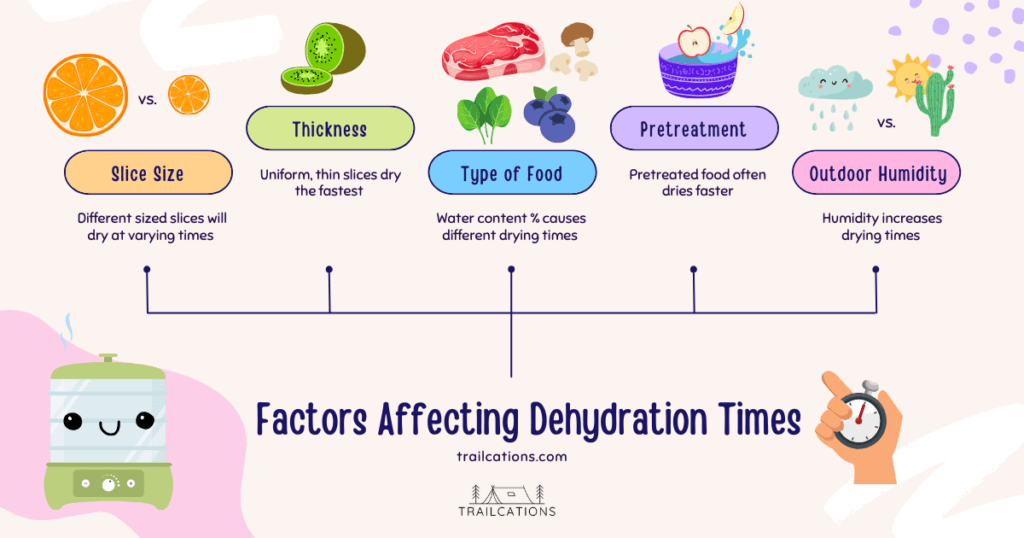
The amount of time it takes to completely dehydrate a food depends on a few factors such as the type of food, the thickness of the food and the humidity levels outside. Thicker slices of food take longer to dry than thinner slices and higher humidity levels will also slow down the drying process.
Even Drying Is The Goal
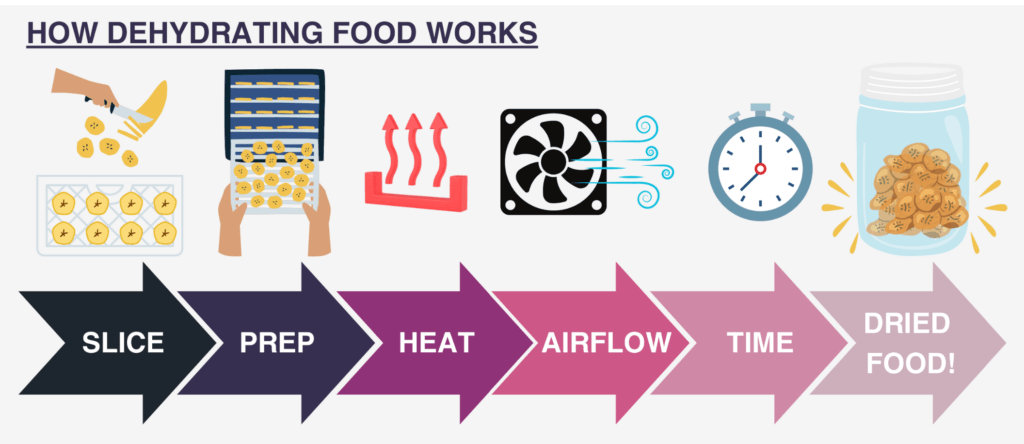
Using a food dehydrator is easy! Simply prepare the food by cleaning and slicing it into thin, even pieces. Arrange the food into a single even layer on the dehydrator trays, making sure there’s enough space for air to circulate. This ensures everything dehydrates evenly and at the same time. Then, set the temperature dial on the dehydrator and let it do its thing!
Fully dried food is typically crispy and dry to the touch. You can eat the food as is, or rehydrate it by soaking it in water (or other liquid) before using it in recipes. From fruits and veggies to meats and herbs, a food dehydrator truly opens up a world of culinary possibilities.
Key Takeaways
- Food dehydrators work by using low heat and a fan to remove moisture while preserving nutrients and flavors
- Dehydrating a variety of foods is possible, including fruits, vegetables, and meats
- Food dehydrators are useful for creating shelf-stable snacks, preserving produce, and preparing for outdoor activities
How a Food Dehydrator Works: The Dehydration Process
Removing Moisture
To understand how a food dehydrator works, first, you need to know its primary function: removing moisture from your food. A dehydrator uses a combination of low heat (95-165℉ / 35-74℃) and a constantly blowing fan to achieve this.
As the hot air passes over the food, moisture inside the food evaporates into water vapor and the fan blows the moisture heavy air away. Over several hours, the food dries out, leaving behind an ingredient with only 5% to 15% moisture remaining. It’s pretty impressive as some fruits and vegetables contain up to 95% water!
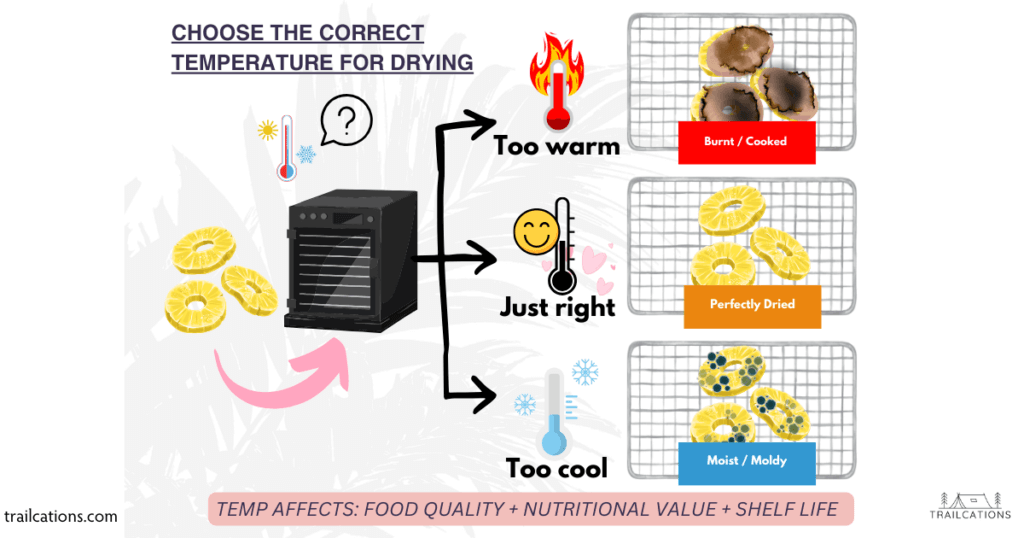
Select the proper temperature setting based on the type of food. Typically, you’ll set the dehydrator to a lower temperature than cooking or baking to avoid over-drying or burning the food. This slow and steady process helps you maintain the quality and flavor of your ingredients while extending their shelf life.
Stopping Bacteria Growth
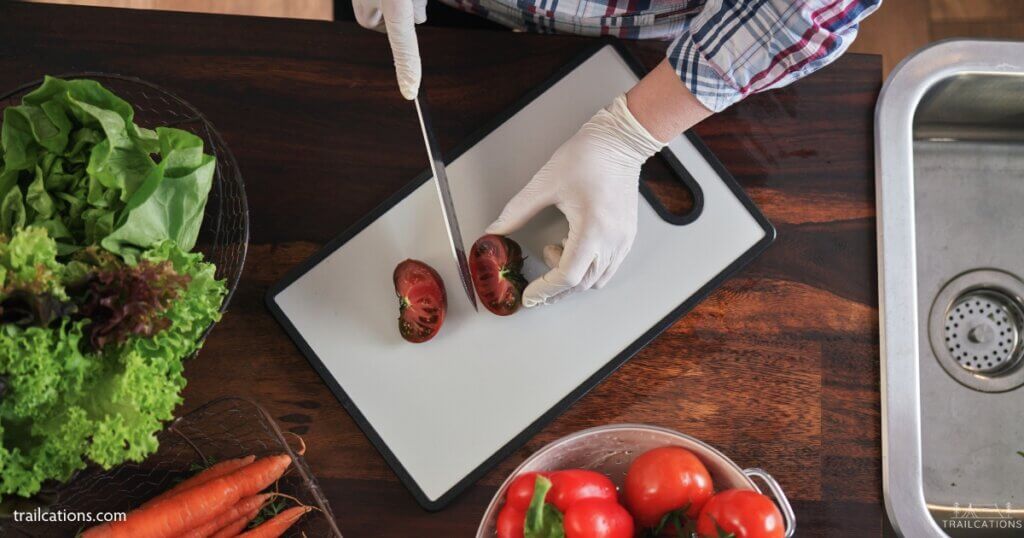
Another essential step in the dehydration process is stopping bacteria growth. When food retains too much moisture, it creates an environment for bacteria to thrive. By dehydrating your food, you’re reducing its water content so much that it slows down any potential bacterial growth.
To achieve consistent and thorough dehydration, you should evenly distribute the food on the dehydrator trays. Thinly sliced, evenly spread pieces will ensure uniform drying and prevent any unwanted bacterial activity from trapped moisture.
While dehydrating your food, it’s crucial to be mindful of the process, regularly checking for even drying, and adjusting the tray position or increasing the time as needed. With practice and attention to detail, you can effectively dehydrate various types of foods, from fruits and vegetables to meats and more, all while maintaining their naturally vibrant flavors and preserving their nutrients.
Remember to keep your materials clean and sanitary, as this will also help prevent bacterial growth and ensure a successful dehydration process.
Why Use a Food Dehydrator? What are the benefits of using a food dehydrator to preserve food?
Food dehydrators offer so many benefits for those looking to preserve and enhance their food’s flavors and save money while doing so! For a more complete list of benefits to using a food dehydrator, check out our article 49 Amazing Benefits of Dehydrating Food.
Preservation
One of the best reasons to use a food dehydrator is to extend the shelf life of fruits, vegetables, meats and more. How a food dehydrator is that it removes almost all of the moisture from the fresh ingredients. This effective preservation process allows you to store dried meals, snacks and more for months or years without spoiling or losing nutrients.
How a Food Dehydrator Works to Improve Flavor
Another advantage of using a food dehydrator is that it helps concentrate the natural flavors and nutrients of a food. The low temperatures of dehydration actually dry a food without cooking it, preserving almost all of the essential vitamins and minerals naturally found in a food.
As a result, you can enjoy the full, rich flavors of your favorite snacks without unnecessary preservatives and additives. Many of the world’s top Michelin star restaurants actually use dehydrated ingredients to make their meals more flavorful and delicious.
Cost Savings
Food dehydrators are also helpful for those who are trying to be environmentally conscious and save money. Home dried food often costs a fraction of the price as what is available at the store. How a food dehydrator works is so efficient that the average electricity cost of drying a batch of food (often many pounds or kilograms) for 10 hours amounts to only $0.50 to $2!
Dehydrating produce in season and on sale preserves food for years to come while saving you money. Home dried food also reduces packaging and transportation costs for out of season produce coming from across the globe.
Health Benefits
Dehydrating your own food means you control exactly what goes into your meals and snacks. Unlike dehydrated food at the store, making your own dehydrated food means there are no extra additives, preservatives, salts or sugars added.
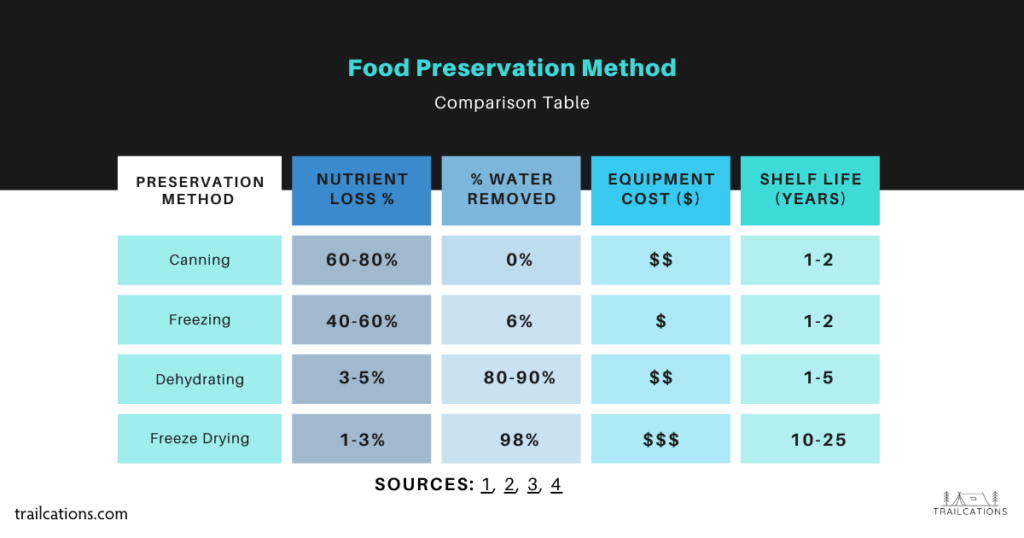
Food Preservation Method Comparison Table Sources: 1, 2, 3, 4
Dehydrating Retains Almost All Nutrients
Compared to other food preservation methods such as canning and freezing, dehydrating retains significantly more nutrients and is more shelf-stable for longer! How a food dehydrator works using low heat, long drying times and a fan preserves almost all of the nutritional value of the fresh food.
A Dehydrator is a Must-Have for Dietary Restrictions and Food Allergies
If you have dietary restrictions or food allergies, using a food dehydrator allows you to experiment with unique recipes and create personalized, healthy snacks.
Since I have a gluten sensitivity, I am able to use my dehydrator to make tons of meals and snacks that meet my dietary needs. I don’t have to pay extra for special ingredients or worry about cross-contamination. Some of my current favorite food dehydrator recipes are fruit leathers, spiced veggie chips and savory jerky.
Healthy DIY Backpacking and Camping Meals for Cheap
Additionally, dehydrated food comes in handy for people like me who enjoy outdoor activities like camping and hiking, as it offers lightweight, nutritious options for on-the-go meals. Say goodbye to expensive backpacking meals and shelf stable meals filled with tons of preservatives!
How a food dehydrator works is so efficient, easy to operate and cheap that it’s extremely cost effective for outdoor enthusiasts trying to eat healthy. DIY dehydrated meals and snacks not only save you money, they save your health and help you avoid overly salty, sugary and preservative-filled store bought ingredients.
What Are the Disadvantages of a Food Dehydrator?
While food dehydrators are a great tool for preserving food, there are some disadvantages to using them. Here are four potential disadvantages of a food dehydrator:
1. Energy Consumption:
Food dehydrators require electricity to operate, which can be a disadvantage if you are trying to live off-grid or reduce your energy consumption. However, it typically only costs about $0.50 to $2 in electricity costs to completely dry a batch of food.
2. Limited Capacity:
Most food dehydrators have a limited capacity, meaning you can only dehydrate a certain amount of food at one time. This can be a disadvantage if you have a large amount of food to dehydrate.
3. Longer Dehydration Times:
Dehydrating food can take a long time, depending on the food and the dehydrator. This can be a disadvantage if you need to dehydrate food quickly. How a food dehydrator works is by using low temperatures and slow timing to preserve the nutritional value. Other options for dried food are purchasing commercially available ingredients.
4. Nutrient Loss:
Dehydrating food results in some nutrient loss, especially if the food is dehydrated at high temperatures. This can be a disadvantage if you are looking to preserve the maximum amount of nutrients in your food. The best bet to preserve the most nutrients is by freeze drying. However, a freeze drier is extremely expensive, on the order of many thousands of dollars.
5. Purchasing Price:
High quality dehydrators can cost several hundred dollars. Lower quality dehydrators models cost under $100. However, they tend to have less drying capacity and lack of adjustable thermostats. For budget conscious individuals, you can actually find great deals on slightly used dehydrators on Facebook Marketplace, eBay and other secondhand appliance websites.
6. Takes Up Counter Space:
If you live in a small apartment, dorm or shared living space, a dehydrator can take up a significant amount of valuable counter or closet space. Some larger dehydrator models can take up as much space as a microwave (or more!).
Types of Food Dehydrators
There are two primary types of food dehydrators: Vertical Airflow Dehydrators and Horizontal Airflow Dehydrators. The key difference in how these food dehydrators work lies in the airflow direction.
Vertical Airflow Dehydrators
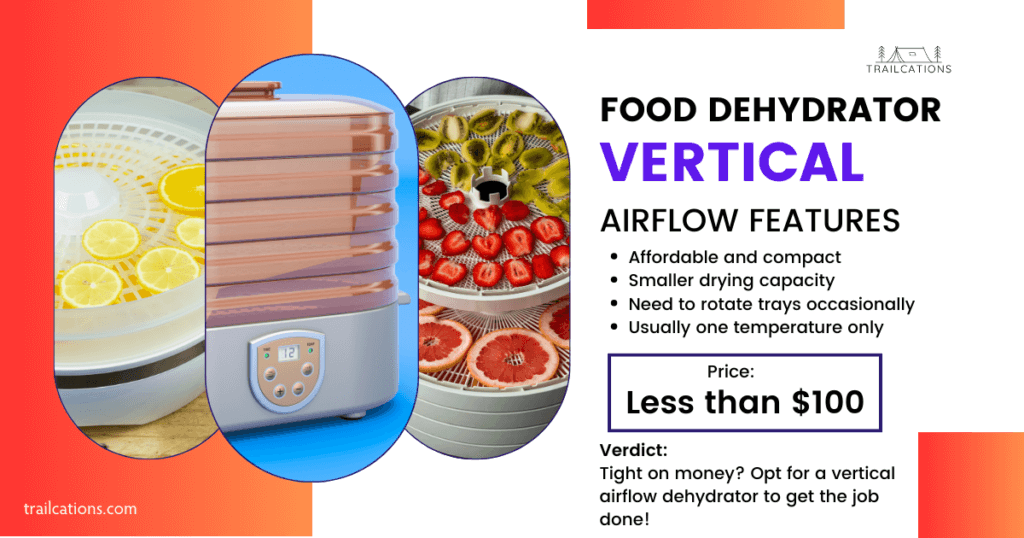
- These models have a fan at the bottom or top of the unit that circulates air vertically across the food trays. Despite being more budget-friendly, the design of vertical airflow dehydrators design causes uneven drying.
- Budget models may not have an adjustable temperature dial which can actually cause food to burn if left in too long. You’ll have to rotate trays and even individual pieces of food every few hours to achieve even drying.
- This type of food dehydrator offers a compact design and flexibility, allowing you to expand its capacity by adding more trays as needed. They’re perfect for those with limited space and a need for customizability.
- Vertical Airflow Dehydrators tend to be round with holes in the center, decreasing the amount of drying space available. Furthermore, the trays tend to be more difficult to clean compared to shelf tray systems.
Also known as: Stackable tray dehydrators, Round dehydrators
Common Brands of Vertical Airflow Dehydrators:
- Cabela’s Harvester Five-Tier Dehydrator
- Cabela’s Harvester Pro Five-Tier Dehydrator
- Chefman 5-Tray Round Food Dehydrator
- Cosori Pioneer 5-Tray Food Dehydrator
- Cuisinart Dehydrators (All Models)
- Hamilton Beach (All Models)
- LEM Products 5-Tray Digital Dehydrator
- Magic Mill 5-Tray Stackable Food Dehydrator
- Nesco Dehydrators (All Models EXCEPT Stainless Steel and Snackmaster Jr.)
- Open Country Food Dehydrators (All Models)
- Ronco Food Dehydrator (All Models)
- Weston 4-Tray and some 6-Tray Dehydrators
Horizontal Airflow Dehydrators
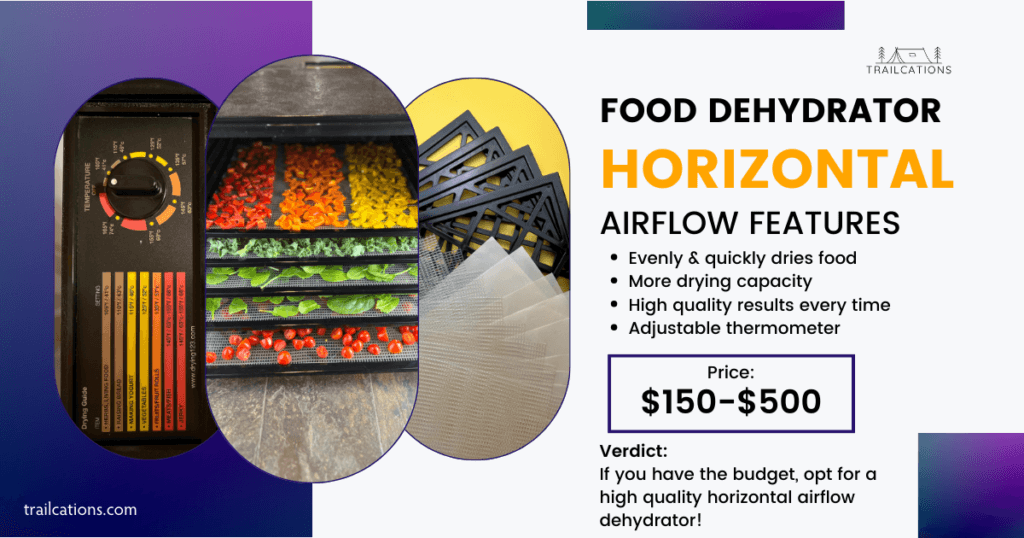
- With a fan located at the back of the unit, these dehydrators circulate air horizontally through the shelves, providing more consistent drying. They might be a bit pricier, but their performance is often worth the investment for dedicated dehydration enthusiasts.
- These usually have an adjustable temperature dial, making high quality dried foods every time without cooking or burning the food.
- With shelf tray systems, you can also dehydrate more food due to their square shape and rear-mounted fan geometry.
- However, these dehydrators tend to be larger and more expensive compared to stackable tray dehydrators and might take up space in a confined apartment or dorm.
Also known as: Shelf tray dehydrators, Box dehydrators, Cabinet dehydrators
Common Brands of Horizontal Airflow Dehydrators:
- BioChef Food Dehydrator (All Models)
- Cabela’s 12-Tray Pro Series Dehydrator
- Cabela’s 6-Tray Heavy-Duty Dehydrator
- Cabela’s 10-Tray Deluxe Dehydrator
- Chefman Dehydrators (All Models Except 5-Tray Round Dehydrator)
- Cosori Premium 6-Tray Stainless Steel Food Dehydrator
- Cosori Premium Pro 10-Tray Food Dehydrator
- Excalibur Food Dehydrator (All Models)
- LEM Products Mighty Bite & Big Bite Dehydrators
- Magic Mill Stainless Food Dehydrator (Includes 6-, 7-, 10- & 11-Tray Models)
- Nesco 7-Tray Stainless Steel Digital Dehydrator
- Nesco 4-Tray Snackmaster Jr. Dehydrator
- Presto Food Dehydrator (All Models)
- STX International Dehydra 10-Tray Stainless Steel Digital Food Dehydrator
- Tribest Sedona Food Dehydrators (All Models)
- Weston 10- & 12-Tray Dehydrators, Most 6-Tray Dehydrators
Ultimately, it’s essential to consider your specific needs, such as available space, budget, and intended use, to determine which type of food dehydrator would be best for your kitchen.

How to Choose the Right Food Dehydrator
Choosing the right food dehydrator is crucial to ensure high quality dehydrated foods in your kitchen. Consider various aspects such as size and capacity, temperature control, fan position, noise level, and budget before making a decision. After a decade of dehydrating my own food, at minimum I would want my dehydrator to have an electric fan and adjustable temperature control.
Size and Capacity
Before you purchase a food dehydrator, evaluate the available kitchen space and your dehydrating needs. Dehydrators come in various sizes, ranging from small countertop models to large, heavy-duty appliances. Ensure the dehydrator you choose has enough tray capacity for your dehydrating needs.
Keep in mind that circular stackable trays have less dehydrating capacity than square shelf trays systems. Generally, how a food dehydrator works is the more drying space, the higher the price.
Remember, you can preserve anything from fruits, vegetables, meats, meat alternatives, grains, raw foods, herbs, spices and baked goods. If you have a garden or a large family to feed, you may want to opt for a bigger dehydrator.
Temperature Control
Dehydrating foods at the right temperature is important to maintain their flavor, texture, and nutrients. Look for dehydrators with adjustable temperature controls, preferably those that offer settings between 95°F to 165°F (37℃ to 74℃).
A dehydrator without an adjustable temperature dial can heat up too high and burn delicate herbs, fruits and veggies or can be too low of a temperature and not safely dry meat, fish and jerky. Typically how a dehydrator works is that adjustable thermometer models cost more than a model with a fixed temperature.
In our opinion, it’s worth paying a little extra to be able to adjust the temperature. This helps you avoid burning off the flavorful volatile oils in delicate herbs or scorching sugary fruits which we have done before. Most fixed-temperature dehydrators operate on the higher side, around 160°F (71℃), which can cause herbs, fruits and vegetables to cook, burn or even start smoking!
If you’re unsure about the temperature in your dehydrator, insert a quick-read thermometer between the trays and adjust the temperature setting as needed.
Fan Position
A dehydrator needs to have a fan to blow hot, moist air away from the food, otherwise food will spoil before it dries. Having a good fan is a very important factor in how a food dehydrator works. Without a fan, the food can take days to dry, allowing bad bacteria and mold to grow which can lead to food poisoning.
Vertical airflow (aka Stackable tray) dehydrators have bottom- or top-mounted fans which blow air vertically. However, bottom- or top-mounted fans tend to blow unevenly up the stackable trays which means food closest to the fan in the center dries faster than food on the outside. You may need to not only rearrange drying trays but even individual pieces of food to avoid burning and promote even drying.
On the other hand, rear-mounted fans found in Horizontal airflow (aka shelf trays or cabinet) dehydrators blow across the trays allowing for faster, even drying.
Noise Level
A food dehydrator runs for hours, so noise level can be an important factor for some people. Before purchasing a dehydrator, feel free to research the noise levels associated with the model. Some may be eerily quiet, while others produce a humming or buzzing sound in the background. Opt for a model that fits your noise tolerance.
My Excalibur 9-tray model operates at about the same noise level as a drying machine so I usually place it in another room while it runs. It sounds like a louder version of a white noise machine.
Timer
A timer for a food dehydrator may sound important, but it’s more of a nice to have option than truly necessary. Because so many factors affect dehydrating time such as food thickness, type of food and humidity outside, it may take twice as long to dry the same type of food from one day to the next. A batch of carrots may take 10 hours to dehydrate in dry weather but 20 hours as a rainstorm is rolling in due to increased humidity.
A timer is more of a nice to have than a need to have when it comes to how a food dehydrator works.
Budget Considerations
With a wide variety of options available, there’s a food dehydrator for every budget. While considering the cost, don’t forget about the quality and features offered. To find the right balance, try researching popular models with good reviews within your price range.
For example, the Excalibur Food Dehydrator 9-Tray is a high-quality option, while the Nesco Snackmaster Dehydrator offers better affordability.
A pro tip is that you can usually find lightly used dehydrators for a fraction of the price on second hand goods websites like eBay, Facebook Marketplace and Craigslist. Just make sure you have the seller plug in the appliance before buying to demonstrate how the food dehydrator works.
Preparing Food for Dehydration
Most of the work in dehydrating food at home comes from the prep work. Just like a professional chef, you want to use good food safety practices, have all your tools ready before starting and understand what the recipe calls for.
Cleaning and Slicing
It is important to start with the freshest produce to achieve the best results while using a food dehydrator. Wash and dry produce, trim away excess fat on meats. Cleaning the fruits and vegetables thoroughly helps remove dirt, pesticides and bacteria.
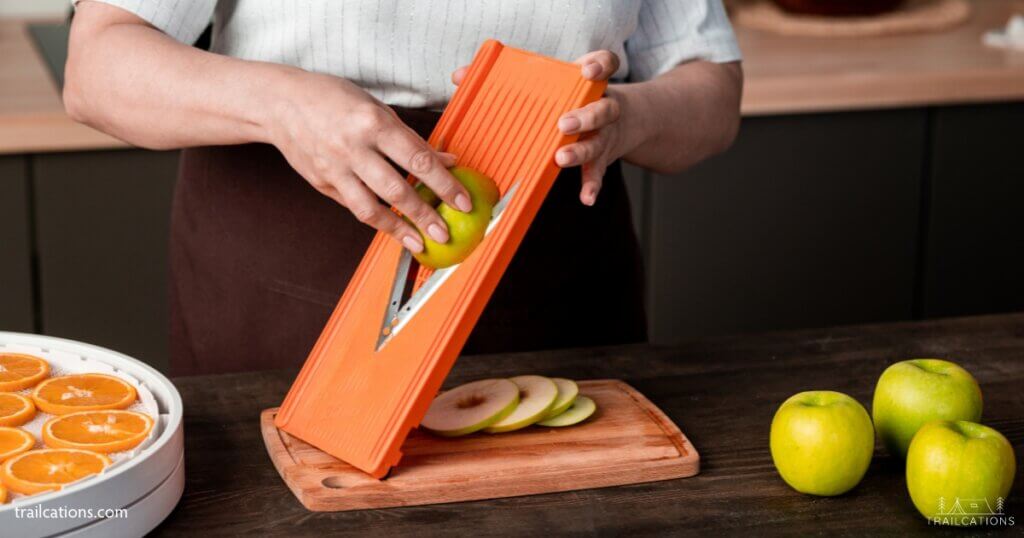
Once cleaned, slice the food into thin, uniform pieces to ensure everything dehydrates evenly and at the same time. Cut food into slices no thicker than ⅛” to ¼” (3 to 6mm).
Thinner slices will dry faster and tools such as a mandoline slicer or sharp knife can help you achieve even thicknesses every time. How a food dehydrator works best is when slices of food are uniform thickness and evenly spaced to allow proper airflow.
Blanching and Pretreatment Techniques
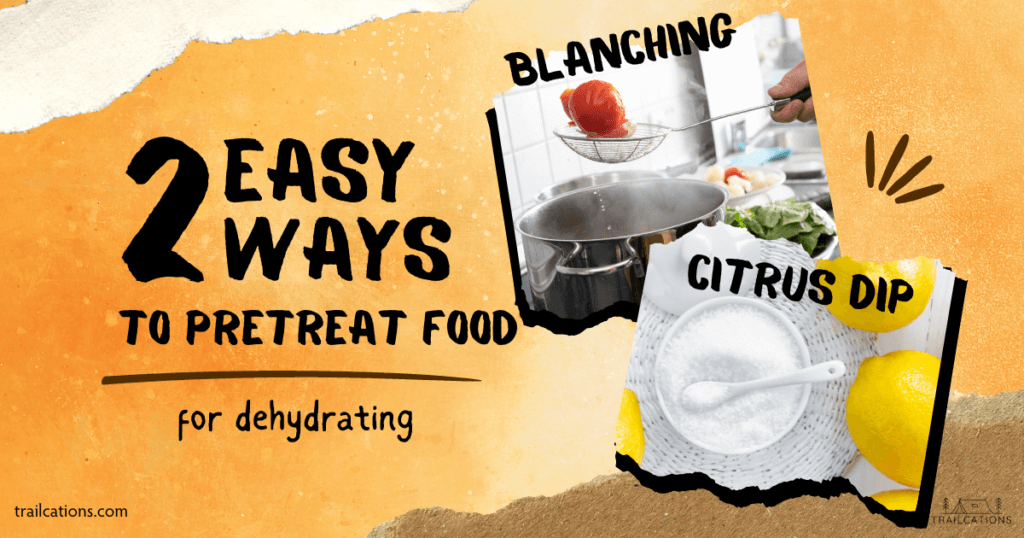
For certain low-acid vegetables (ex: peas, green beans), root vegetables (ex: carrots, beets) or tough-skinned fruits (ex: cherries, grapes), it is recommended to steam or blanch them for 5-10 minutes before dehydrating. This pretreatment helps maintain color and texture and speeds up the drying process. After steaming or blanching, drain or pat the vegetables dry before placing them in the food dehydrator. Poke berries with a fork or slice their skins with a knife for reduced drying times.
For light colored fruits that are prone to oxidizing and browning like bananas or apples, spritzing them with citrus juice or dipping them in a Vitamin C (ascorbic acid) powder or food grade citric acid solution will prevent discoloration. These simple steps make your final product more appealing to eat and adds an extra boost of Vitamin C which is one vitamin that tends to degrade with dehydration. Just remember to apply the citrus juice, citric acid or Vitamin C (ascorbic acid) solution evenly to the fruit slices for consistent results.
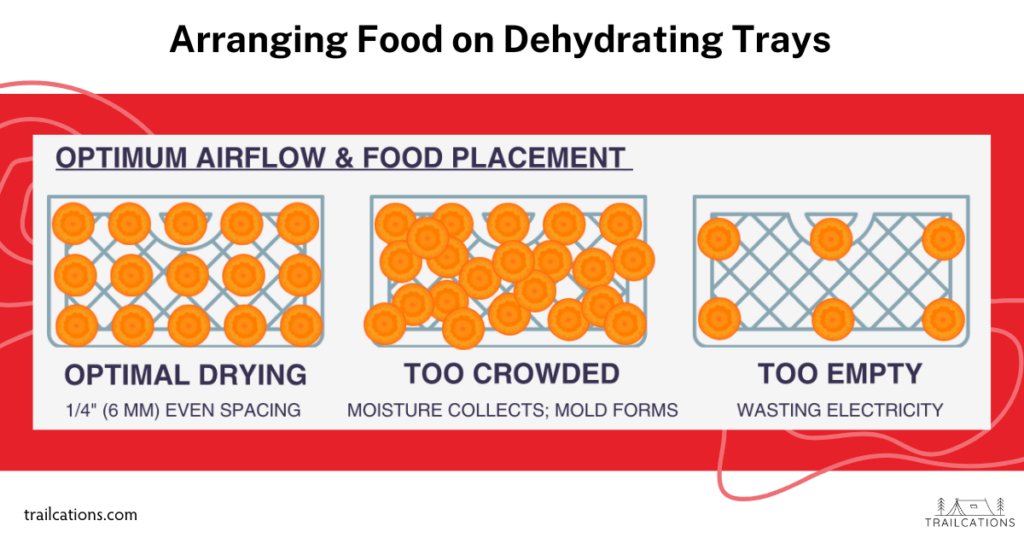
Proper Food Placement (And Why it Affects How a Food Dehydrator Works)
When arranging food on your dehydrating trays, try to space the pieces evenly and avoid overlapping. This allows for optimal air circulation and perfect, evenly dried ingredients. Remember, the thickness of the food pieces will affect drying times. A food dehydrator works best with evenly spaced food cut into thin, uniform slices.
For example, thin herbs like basil, parsley and thyme may take only 2 to 4 hours to dehydrate while thicker, denser fruits such as apricots, figs, pears and grapes can take anywhere from 20 to 36 hours to dry. For best results, check on the food every 2 to 3 hours, rotating trays as necessary to promote even drying.
Since the fan in a dehydrator is stationary, you may find that your particular model of food dehydrator works best when rotating trays as little as once per drying session or as frequently as every 1 to 2 hours.
Using a food dehydrator is a fun and rewarding process, offering endless possibilities for creative and healthy snacks!
Dehydrating Different Types of Foods
Using a food dehydrator is an excellent way to preserve and intensify the flavors of a food. In this section, we’ll discuss the methods and considerations for dehydrating fruits, vegetables, meats, and herbs. Before you get too carried away, check out our full list of 500 Foods You Can and Cannot Dehydrate and free downloadable PDF!
Fruits
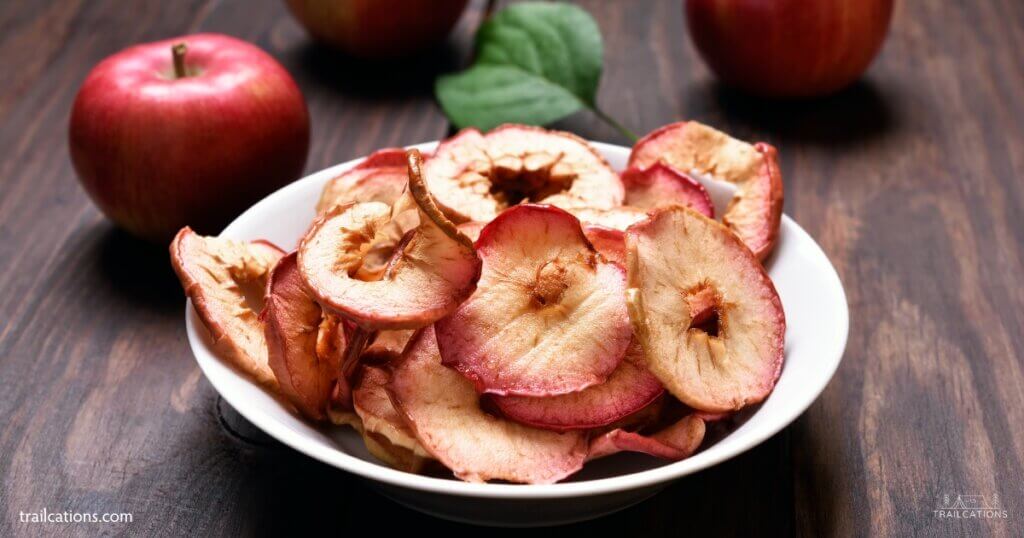
Fruits are one of the easiest and most delicious types of food to dehydrate. They are so naturally sweet and packed with vitamins that you can eat them right off the tray. Sometimes the fruits I dehydrate are so tasty that they don’t even make it to the mason jar for storage!
To dehydrate fruits, first wash, peel, deseed and slice the fruit into uniform pieces. Berries with tough skins can be blanched for 30 seconds or poked with a fork to speed up drying times. Some light colored fruits may require pretreatment, such as dipping apples or bananas in a 1:1 citrus juice and water solution to prevent browning. Place the fruit pieces on the dehydrator trays, ensuring that they don’t overlap. The drying time for fruits varies, but most fruits will be ready in 6 to 16 hours using a temperature setting of about 135℉ (57℃) . Examples of fruits for dehydrating include:
- Apples
- Bananas
- Strawberries
- Mangoes
Vegetables
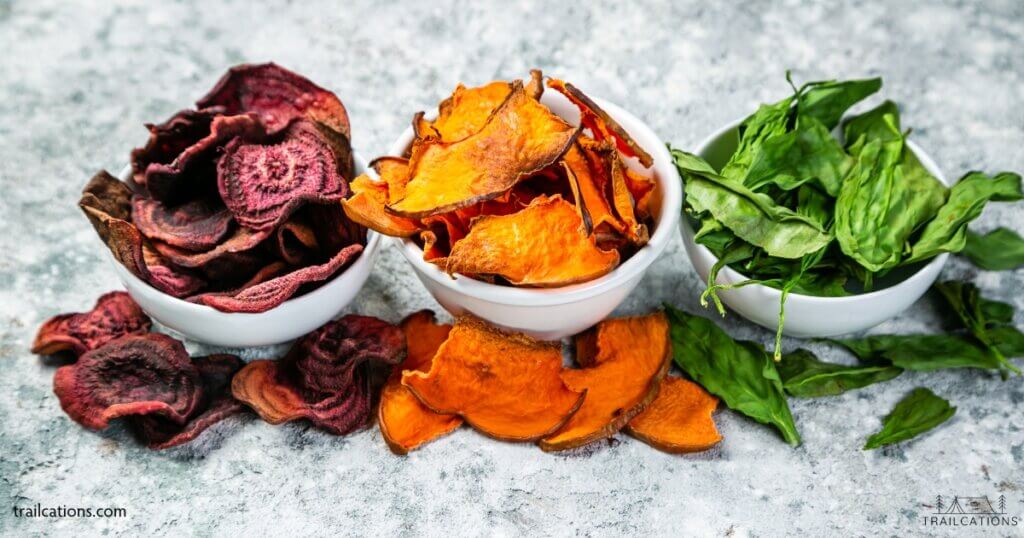
Dehydrated vegetables make tasty snacks or healthy ingredients for cooking. Thoroughly wash, peel and slice the vegetables evenly. Tough root vegetables, green beans or broccoli do well with a short blanching or steaming to retain color and reduce drying time. Arrange the prepared vegetables on the dehydrator trays and dry at 125℉ (52℃). Drying times can range from 6 to 20 hours, depending on the vegetable. Some popular vegetables for drying are:
- Beet chips
- Kale chips
- Tomato slices
- Zucchini noodles
Meats
Making homemade jerky or dehydrated meats is easy with a food dehydrator but you do need to follow food safety protocols. Fatty cuts of meat or oily fish cannot dehydrate completely as the remaining fat will spoil quickly. First, choose lean cuts of meat and trim off any excess fat. If desired, marinate the meat overnight in an oil-free marinade or rub with spices before drying. Next, freeze the meat for about 15 minutes to make it easier to cut into even slices.
Follow the latest USDA Food Safety Protocols by first cooking the meat to at least 160°F (71℃) and poultry to 165°F (74℃) to kill bad bacteria like Salmonella and E coli. After measuring the internal temperatures with a thermometer, place the cooked meat in a single layer in the dehydrator. Dehydrate at a minimum of 155°F (68℃) for about 6 to 12 hours.
Since how a food dehydrator works is by using low temperatures, the USDA has found that placing raw meat directly in the appliance actually can encourage bad bacteria to grow. Cook the meat first to avoid any risk of food poisoning.
Some popular lean meats to dehydrate are:
- Lean beef (less than 10% fat content)
- Shrimp
- Venison
- Turkey
Editor’s Note on Dehydrating Meat
Luckily I didn’t have to be evacuated from the backcountry or get long lasting side effects from improperly dried food but it was pretty touch-and-go for a while. I blacked out, had terrible stomach cramps, got dehydrated and was going to the bathroom 10+ times a day, all in the backwoods. Food poisoning (or worse – botulism) is not an experience I would wish on anyone. These days, I disregard any dehydrating recipe for meat, dairy and eggs that doesn’t follow USDA Food Safety Protocols. I would highly suggest you do the same!
Nuts and Seeds
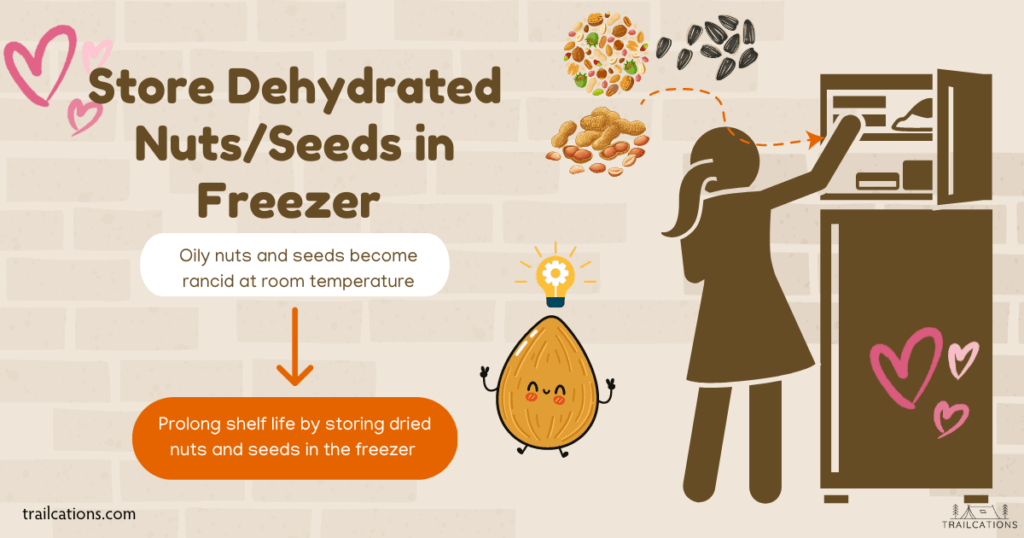
Dehydrating nuts and seeds helps prolong their shelf life and allows you to have lots of healthy, protein rich snacks on hand. However, nuts and seeds have a naturally high oil content and will spoil if stored long term in warm temperatures. If I dehydrate a bunch of sunflower seeds from my garden or black walnuts picked from the forest, I always store the dried ingredients in a cool dry place like a refrigerator or, better yet, a freezer. Nuts and seeds stored in the shells seem to last longer than with the shells removed.
Depending on the type of nut or seed being dried, temperatures ranging from 95 to 110°F (35 to 43℃) usually are low enough to dry the nuts without roasting them. Most nuts and seeds take between 12 to 24 hours to dry completely. Depending on how your food dehydrator works, you may have to occasionally blot away excess oils released from the nuts and seeds.
Some favorite nuts and seeds to dehydrate are:
- Pumpkin seeds (pepitas)
- Sunflower seeds
- Walnuts
- Pecans
Herbs
Drying fresh herbs in a dehydrator is a fantastic way to preserve their flavors and aromas. Pick herbs mid-morning, after the dew has dried but before the sun burns away their volatile oils. Gently wash and pat the herbs dry, removing any brown spots or damaged leaves.
Keep the herbs as intact as possible, laying the whole plant out in a single layer on the dehydrator trays. Always dehydrate herbs at a low temperature around 95°F (35℃). Most herbs will be completely dried within 2 to 4 hours. I’ve found it best to grind the herbs just before you use them to retain the best flavors.
Some herbs suitable for dehydrating are:
- Rosemary
- Thyme
- Oregano
- Basil
Foods You Should Not Dehydrate
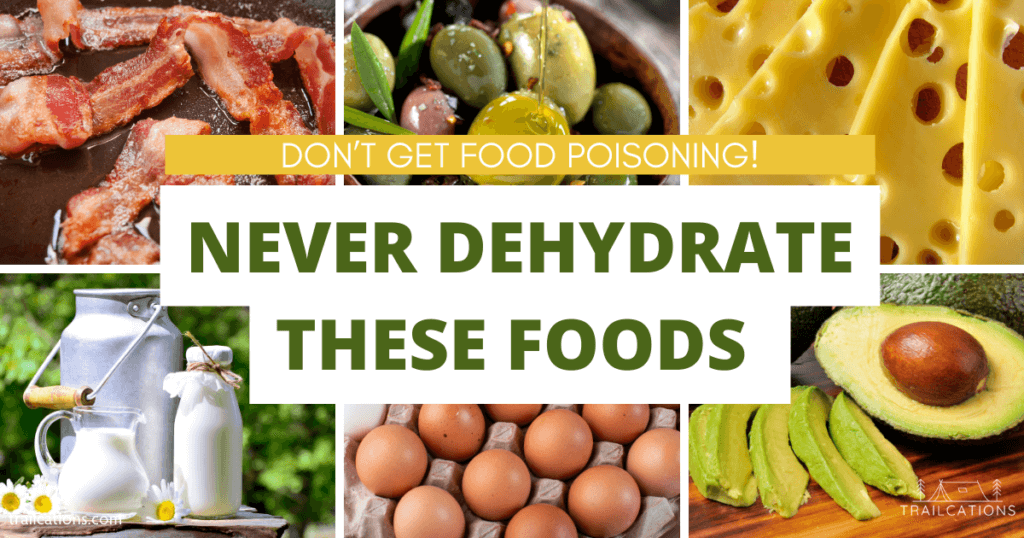
A word of caution: some foods are not meant to be dehydrated. High-fat meats, dairy products, avocados, olives and eggs should be preserved via other methods like freeze drying or spray drying. Sadly even avocados should not be dehydrated.
How a food dehydrator works is by evaporating water from a food using temperatures low enough to dry but not cook. When a food doesn’t have a lot of water because it is mostly oil or fat, the low heat can cause the food to become rancid and spoil. Bad bacteria like E. coli and Salmonella love to grow on fatty or oily mediums where moisture is retained.
But rest assured, there are countless food candidates just waiting for their chance at dehydrated stardom!
Check out our list of 500 Foods You Can and Cannot Dehydrate (and free downloadable PDF)!
Monitoring and Timing
One of the best advantages of how a food dehydrator works is that it requires minimal attention to achieve the best results. Luckily for dehydrating enthusiasts, you cannot overdry food using a food dehydrator with adjustable temperature settings!
However, factors like outside humidity, dehydrator model and food thickness influence how long it takes to dehydrate a food. Monitoring the dryness of a food is more important than timing, which sometimes can be little more than guesswork.
Let’s explore general dehydrating time guidelines and techniques to test the dryness of the food.
What Temperature Should I Dehydrate Food?
The temperature at which you should dehydrate food depends on the type of food being dehydrated. Different foods require different temperatures for optimal dehydration.
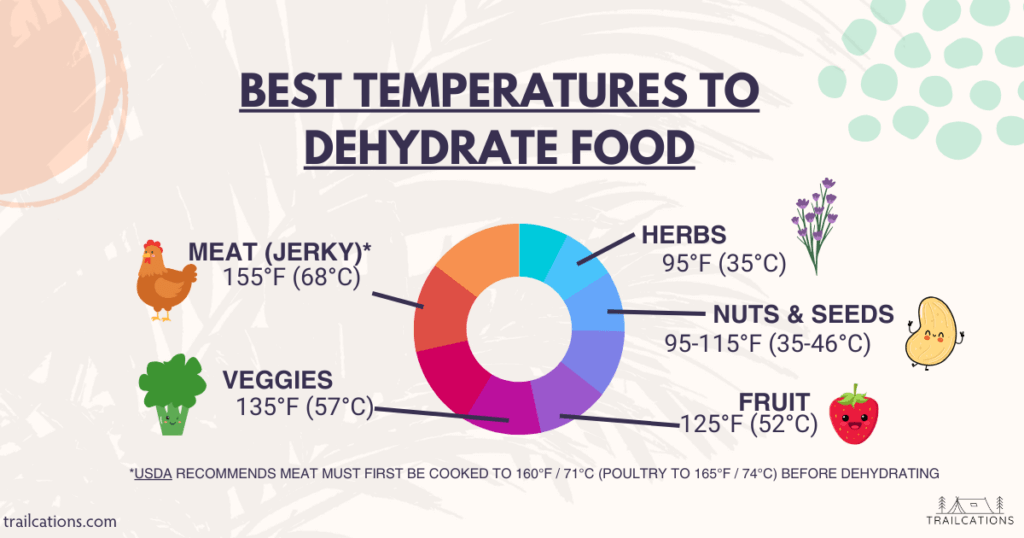
For example, fruits and vegetables are typically dehydrated at temperatures between 125°F (52°C) and 135°F (57°C). Meats are usually dehydrated at temperatures between 145°F and 165°F (63 to 68°C). Herbs are dehydrated at lower temperatures between 95°F and 115°F (35 to 46°C) to preserve their naturally delicate oils.
It’s important to research the optimal temperature for the specific type of food you plan to dehydrate. The temperatures used for dehydrating food balance food safety with optimal nutritional content. Knowing what temperatures to dehydrate food at is key to achieving consistent results.
Dehydrating Food Guidelines: How Long Does it Take to Dehydrate Food?
Different types of food require varying dehydrating times. Some foods may only take a few hours, while others can take an entire day. How efficiently your food dehydrator works depends on several factors. A powerful fan and heating element will dry food quickly. The airflow direction airflow your appliance was designed with also is key.
Surprisingly, outside humidity also plays a large factor with drying times. Expect to be on the shorter end of the drying scale for dry days and err towards the high end on humid or rainy days.
Here are some general guidelines to follow for dehydrating times for various food items:
| Food Item | Dehydrating Time (Approx.) |
| Fruits | 6 to 16 hours |
| Vegetables | 6 to 20 hours |
| Meat (Jerky) | 6 to 12 hours |
| Nuts & Seeds | 12 to 24 hours |
| Herbs | 2 to 4 hours |
Keep in mind that these times may vary depending on factors like humidity, thickness of the food, and the dehydrator’s temperature settings. For best results, check the food regularly, rotate trays as necessary and follow the manufacturer’s guidelines.
Testing Dryness: How Do You Know When Dehydrated Food Is Done?
To ensure food is dehydrated properly, it’s essential to test for dryness. Here are a few techniques for different food items:
- Fruits: Press a piece of the item between your fingers. It should feel leathery and pliable but not moist or sticky. Raisins, figs and dates may feel sticky which is okay.
- Vegetables: Tap the veggie on a hard surface. It should feel hard and brittle. When struck on a firm surface, the vegetable should be hard like a pebble or shatter or break easily.
- Meat (Jerky): Bend a piece of the jerky. It should easily bend without breaking but may crack slightly.
- Nuts and Seeds: They should be crunchy and break apart in your hands.
- Herbs: They should crumble easily when rubbed between your fingers.
When testing for dryness, it’s a good idea to let the food cool for a few minutes before checking. If the food isn’t completely dehydrated, return it to the dehydrator and continue the process, rechecking periodically.
Conditioning the Dehydrated Food
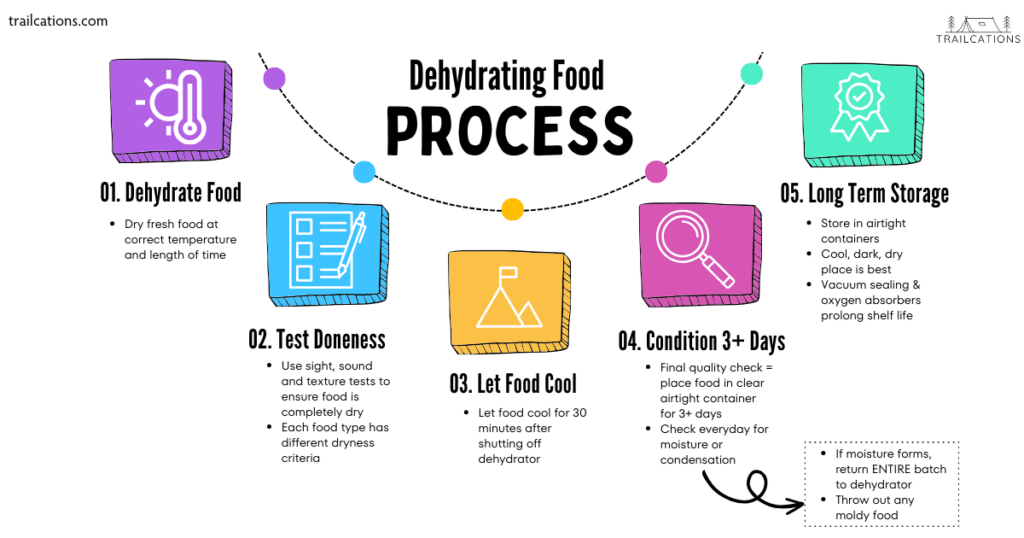
Conditioning is an important final quality check to ensure your food is 100% dehydrated properly. Condition a batch of food by placing your dried ingredients in an airtight container or plastic bag. For at least the next 3 days, check the food daily to ensure condensation doesn’t form.
Individual pieces of food may have more moisture than others due to placement in the dehydrator or thickness. Conditioning allows the moisture levels of the entire batch to equalize. The excess moisture will be absorbed by the drier pieces.
If moisture forms during the conditioning process, simply return the entire batch of food to the dehydrator for several hours. However, if you see any signs of mold or mildew, you will need to throw the whole batch away. Visible mold means spoiled food and a risk for food poisoning. Conditioning dehydrated food is an easy final quality check. It’s a failsafe way to ensure that your food is dried completely before placing it into long term storage.
Can You Overdry Food In A Dehydrator?
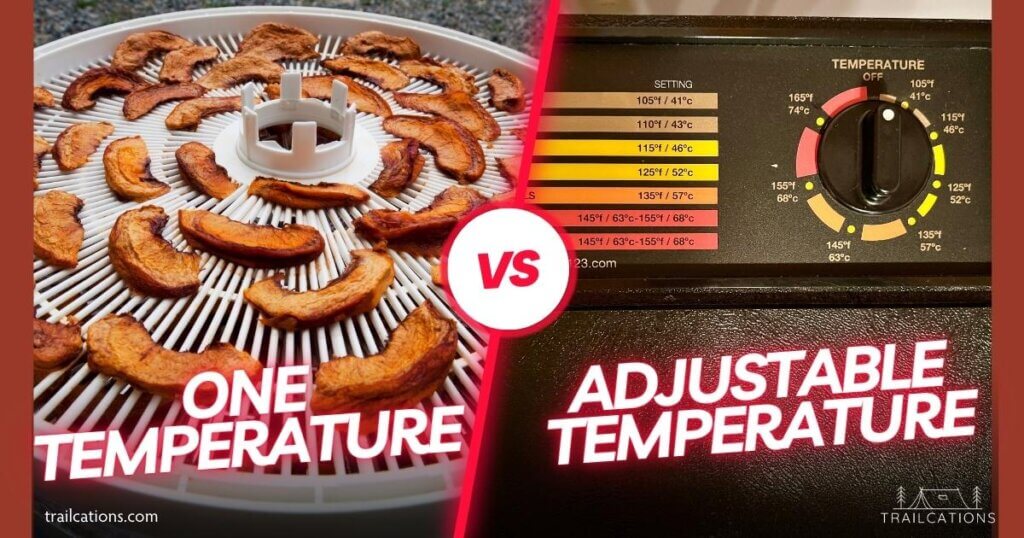
No, you cannot overdry a food with adjustable thermometer dehydrators. But… you can definitely overdry a food, cook it or even burn it in a dehydrator that only has one temperature setting!
(Almost) Impossible to Overdry with Adjustable Thermostats
You cannot overdry food in a dehydrator that has an adjustable thermostat. How a food dehydrator works is that you set a single temperature for the entire drying cycle. If the temperature is appropriate for the type of food, you can’t “overdry” the food.
It is actually better to overdry than underdry and spoil a whole batch from mold growth. If you dehydrate food at the recommended temperatures for the type of food (ex: Vegetables should be dehydrated at 135°F (57°C)), it’s pretty much impossible to “overdry” the food.
With an adjustable thermometer, the dehydrated food water content will top out at a certain level (ex: 10%) and then continue to flat line as long as the dehydrator is kept running. It’s great to know that you’ll still have delicious, high quality results even if you leave your dehydrator going overnight or while out running errands.
Beware of Overdrying (and Catching on Fire!) Drying Food in Fixed Temperature Dehydrators
CAUTION: Home dehydrator enthusiasts beware if your dehydrator that does not have an adjustable thermostat as you can actually overdry your food and even burn it! Speaking from experience, you really have to keep a watchful eye on dehydrators that don’t have adjustable thermometers. You can actually cook, burn or even have your food start smoking!

Storing Dehydrated Foods
Once the dehydrating process is completed, it’s essential to store dehydrated foods properly to ensure they maintain their quality and have a long shelf life. Follow these guidelines to make sure dehydrated foods remain fresh and tasty for as long as possible.

Storage Containers
First, choose appropriate containers for storage. Airtight containers, such as mason jars, tupperware or plastic vacuum seal bags, are ideal for keeping oxygen out which can cause spoilage over time. Glass containers and clear vacuum seal bags are excellent choices as you can easily see if moisture has leaked into the food.
Vacuum sealing and adding a food grade oxygen absorbing packet into the container also helps lengthen shelf life of a dehydrated food.
Speaking from experience, avoid using cheap plastic sandwich bags for long term storage as the thin plastic will degrade over several months and leach plastic flavors into your food. My favorite way to store food that I’ll eat in the next few weeks in vacuum-sealed clear glass jars. Food that I’ll eat at least a month or more out, I vacuum seal in special vacuum seal bags.
Temperature, Light and Moisture
Temperature, light exposure and moisture levels are essential factors when storing dehydrated foods. Once you shut off your food dehydrator, your food starts absorbing moisture from the ambient air, especially if you live in a humid environment. Be quick about storing your dried food!
It is best to store dehydrated foods in a cool, dark, dry place to protect them from sunlight and heat which can zap nutrients and shorten shelf life.
According to the National Center for Home Food Preservation, the ideal storage temperature for dehydrated foods should be around 60℉ (15℃). Keeping foods at this temperature helps prevent the growth of bacteria and mold.
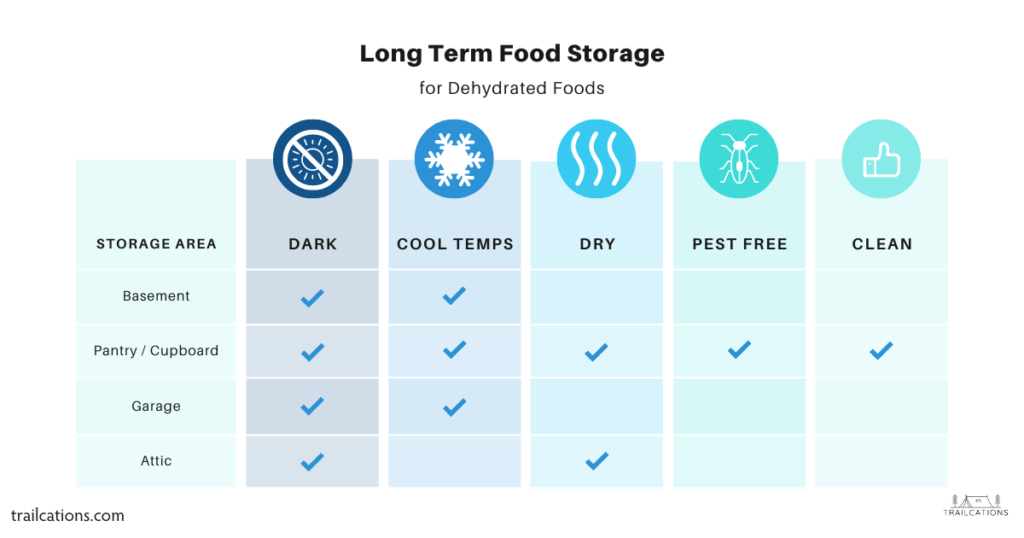
Storage Location
Good places to store your dehydrated foods are places with cool temperatures, little moisture and darkness. Examples of a food place to store dehydrated food are a shelf in a root cellar, a dark room in a basement, in an infrequently used pantry or closet shelf. Places to avoid storing dehydrated food include under the sink, directly on a concrete floor, in a bathroom, next to water pipes, in a frequently used cupboard, in an attic or near a window.
Shelf life varies for different types of dehydrated foods. In general, dehydrated fruits and herbs can be stored for up to one year if properly stored. It’s always a good idea to periodically check the food for any signs of spoilage, including moisture, mold or off-putting smells. If something seems off, it’s best to discard the item.
Here are some Pro Tips for storing dehydrated foods:
Labeling:
- Label containers with the name of the food and the date it was dehydrated to help keep track of shelf life. Unless you have a photographic memory, you’re probably not going to remember what those dried contents are several months from now! Dehydrated food can look pretty similar.

Separate Ingredients
- Keep different types of dehydrated foods separate during storage to prevent flavors and odors from mixing. Very few people like onion-flavored bananas!
Cool Down
- Before storing, allow the dehydrated food to cool completely to room temperature (about 30 minutes) to prevent condensation inside the container, which can lead to spoilage.
Portions
- Store small amounts of dehydrated food in separate containers to minimize exposure to air and moisture when opening the container for use. If a batch of food in a small container goes bad, it won’t be as much of a loss as it would if stored in bulk in a large container.
Following these simple yet effective storage techniques will help ensure that dehydrated foods remain safe and delicious for an extended period, making them a fantastic addition to any pantry!

Recipe Ideas and Creative Uses
Food dehydrators offer a world of possibilities when it comes to preparing snacks, meals, and even pet treats. The following ideas showcase the versatility of these kitchen appliances and will surely inspire you to get creative with your dehydrator.
Fruit and Vegetable Chips:
Transform fruits and vegetables into delicious and healthy chips by dehydrating them. Some popular choices include apple chips, banana chips, beet chips, and kale chips. Slice your favorite produce thinly, season them if desired, and let the dehydrator do its magic.
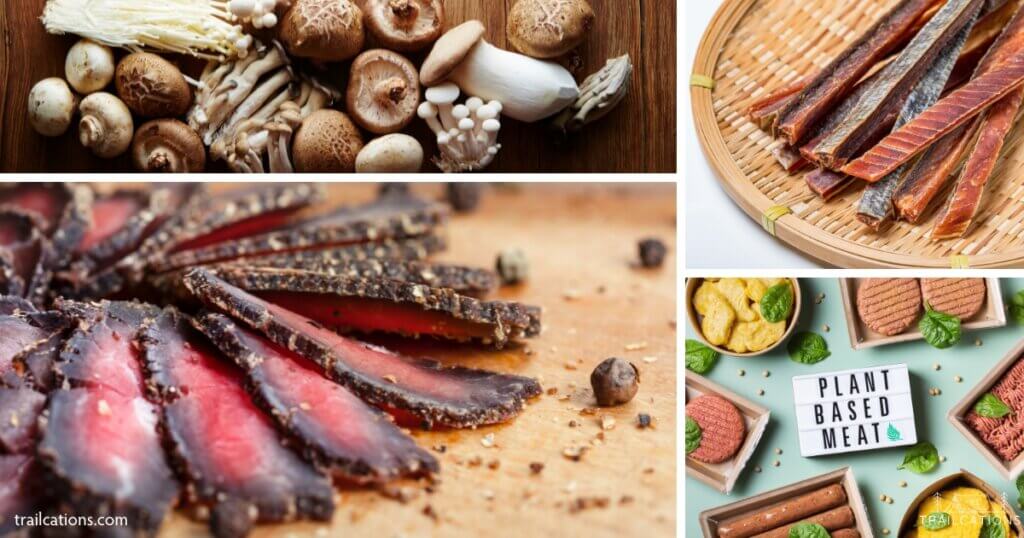
Meat, Beef Jerky and Plant-Based Jerky:
People can make their jerky using various meats like beef, turkey or cod and meat alternatives such as plant-based meats, mushrooms and cauliflower.
For meats, choose lean cuts, marinate the ingredients, cook until safe internal temperatures have been reached and dehydrate until the desired texture is achieved.
For plant-based jerky, mix ingredients together, puree, use a jerky gun or spread into even strips on dehydrator trays and hit the dehydrate button. Homemade jerky makes a perfect high-protein snack for those on the go.
Raw Crackers and Sprouted Grains:
For those following a raw food diet, the food dehydrator is a game changer. The great thing about how a food dehydrator works is that it uses low enough temperatures that only dry the food, not cook it! Almost all of the nutrients are preserved, allowing you to easily stick to the raw food diet without worrying.
Combine ingredients like sundried tomatoes, walnuts, ground flax and seasonings in a food processor, then dehydrate these raw crackers for a healthy and satisfying treat. Sprout your own grain easily in a dehydrator, then dehydrate it for use in raw food breads, cookies and pastries.

Gluten-Free, Vegan and Vegetarian Meals:
Dehydrators make it so easy to create meals for those with food allergies like gluten or those with dietary preferences like vegans and vegetarians. Traditional ingredients can easily be replaced with healthy, preservative free home dried alternatives that might be impossible to find at the store. For example, egg and wheat based pasta noodles can be easily replaced in dinner recipes with spiralized and dehydrated carrots, zucchini and sweet potatoes.
Having a dedicated allergen free dehydrator is a game changer! With how a food dehydrator works, it’s extremely easy to make meals and snacks that fit any dietary restriction.
Granola, Bars and Trail Mixes:
It is so easy and cheap to make your own granola and trail mixes in a dehydrator, free from excess sugar and sweeteners like those found at the store. Plus, the taste of home dried ingredients such as dehydrated fruits, nuts and sprouted grains wins every time over the store bought stuff!
We are currently obsessed with how our food dehydrator works to make fruit taste sweeter, nuts become nuttier and homemade granola is so good that it’s difficult to eat anything else. Making your own granola bars has never been easier with a dehydrator!

Camping and Backpacking Meals:
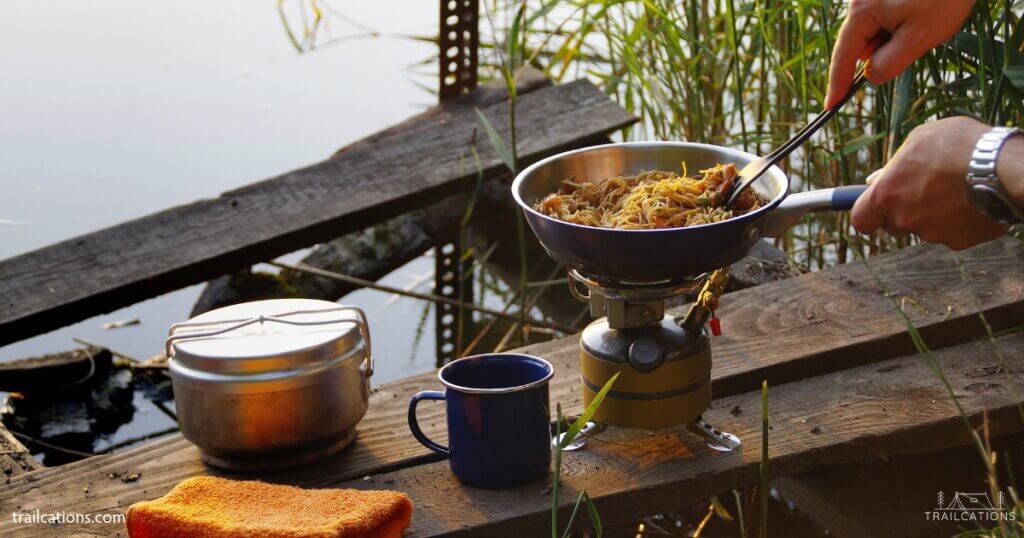
There are many types of savory meals that can be dehydrated at home for camping and backpacking trips. The best part of dehydrating your own meals is that you control how much salt, sugar and preservatives go into them.
Dehydrating your own camping meals not only lightens the weight of the ingredients but is actually often much more cost-effective than purchasing your own meals. Here are some examples of DIY dehydrated camping and backpacking meals:
- Dehydrated soups and stews
- Pasta dishes (such as spaghetti or lasagna)
- Dehydrated meat dishes (such as turkey dinners, shepherds pie)
- Dehydrated chili
- Rice dishes
- Dehydrated hummus or other dips
- Stir fries
- Veggie noodles and “rice” (spiralized zucchini, carrots or riced cauliflower, broccoli)
These types of meals are lightweight, easy to pack, and can be rehydrated with hot water. They are perfect for camping, backpacking, or any outdoor adventure where you need to pack light and have easy-to-prepare meals.
Herbs, Spices and Flavor Powders:
How a food dehydrator works makes it super easy to preserve the flavor of fresh herbs and spices. Simply spread them out on the trays and dehydrate until they’re dry and crumbly. Dried herbs can be stored in airtight containers, providing a burst of flavor to your dishes all year round.
Flavor powders are my new favorite culinary experiment where ingredients are dried then ground into delicious meal-enhancing flavor boosters. Take your bland meals to the next level with flavor powders made from dehydrated ground mushrooms, plantains, kimchi, balsamic vinegar, pickles and soy sauce!

Cocktails and Infused Liquors:
Dehydrated fruits, vegetables and flavor powders are perfect ingredients to add to cocktails. From a camping mojito with shelf stable dried lime and mint to backcountry margs made with dehydrated homemade margarita mix.
Dehydrated fruits can be rehydrated in wine to make a refreshing sangria or infused in different liquors to enhance your adult beverage experience.
Mason jar cocktails are beautiful gift ideas for friends and family who like to unwind by the campfire or next to a lake. Dried citrus wheels are beautiful additions to a cocktail. Experiment recreating your favorite drinks with the concentrated flavors of dehydrated foods and you might never go back to using fresh ingredients!
Pet Treats:
Show your furry friends some love by making them homemade pet treats using a dehydrator. From dehydrated sweet potato dog treats to dried savory chicken cat food, the options are endless, and your pets will surely appreciate the extra care.
These are just a few ideas to get started with your food dehydrator. The options are truly endless, and experimenting with different recipes and combinations will help you discover new favorites perfect for snacking, cooking, and even gifting to friends and family.
Cleaning and Maintenance: How to Keep a Food Dehydrator Working for Decades
Proper cleaning and maintenance of your food dehydrator is essential to ensure the best results and extend the life of your appliance. Cleaning between batches of dehydrating is the best preventative maintenance to keep your dehydrator running for many years to come. Here are some tips and steps to keep your dehydrator in top condition:

Clean Trays:
First, always start with clean and dry trays. This helps prevent food from sticking, stops strong food smells from transferring and makes cleanup easier. To clean the trays, you can soak them in warm, soapy water followed by gentle scrubbing to remove dried-on food pieces.
Alternatively, if your trays are dishwasher safe, you can also place them in the dishwasher. If the food is really stuck on, soak the trays for several hours to loosen the condensed natural sugars.
An old toothbrush or scrubbing brush can help get into the nooks and crannies of your dehydrator trays. New dehydrator models with nonstick coated trays tend to be easier to clean compared to older models.
Clean Interior:
For the outside and interior walls of the dehydrator, use a mixture of soap and warm water, or opt for a solution of white vinegar to clean and sanitize the surfaces. Always be gentle when cleaning, and ensure that the appliance is unplugged before you start. For box or cabinet style dehydrators, a gentle shake of the dehydrator and a damp paper towel can help sweep out any dried foods that may have fallen deep into your dehydrator.

Inspect Heating Element and Fan:
Regularly check and clean the fan and heating elements of your dehydrator. Remove any dust or food buildup that might impede airflow and affect the appliance’s performance. Always follow the manufacturer’s instructions for cleaning and maintenance to avoid damaging your dehydrator.
Some additional tips to make cleaning simpler include:
Avoid Food Sticking:
- For fruit leathers or tiny pieces of food, use non-stick dehydrator sheets or parchment paper to prevent food from sticking to the trays. Never spray oil on the trays before dehydrating as it will cause your food to become rancid in storage. Instead, opt for parchment paper. Avoid wax paper which can melt and aluminum foil which can short out electrical components or crumble when interacting with acidic foods like tomatoes.
Even Placement of Food:
- Don’t overcrowd the trays, as this can make the cleaning process more difficult and affect the quality of the final product. Place food in a single, even layer and leave a little bit of space between ingredients to allow for optimal airflow.
Dry Trays Completely:
- After washing trays, shake off any excess water and turn them right side up over the sink to avoid water getting trapped in their edges. Alternatively, stick them right back in your dehydrator on the lowest setting for 20 minutes to, well, dry them out!
By following these guidelines and maintaining a regular cleaning routine, you ensure the longevity and efficiency of your food dehydrator, helping you create delicious and healthy treats for years to come.

Dehydrating Dilemmas: Common Concerns and Solutions
Uneven Drying
When it comes to drying foods in a dehydrator, one might occasionally encounter the dreaded issue of uneven drying. Fear not, for there are ways to conquer this problem!
Firstly, always ensure that food pieces are of a similar size and thickness. This will help our handy dehydrator distribute heat more evenly, ensuring consistent results.
Another top tip is to rotate those trays every couple of hours. For horizontal airflow trays, rotating the trays 180 degrees halfway through drying times seems to solve the uneven drying problem.
For vertical airflow trays, shut off the dehydrator and swap the trays furthest away from the fan closer to the fan. You may also have to rotate individual pieces of food at the interior to the outside to avoid burning.
Lastly, be cautious when it comes to stacking food too closely together. Remember, our dehydratable treats need space to breathe!
How a Food Dehydrator Works: Effects on Nutritional Value
Now, we know what you’re thinking: “Does dehydrating food rob it of its precious nutritional value?” The answer is a little more complex than your average yes or no, but let’s break it down.
During the dehydration process, some vitamin and mineral content may be lost, particularly that of water soluble Vitamins A and C. However, the process does retain the majority of a food’s inherent nutrients – about 95 to 97% of nutrients remain after dehydrating! Compared to freezing (40-60% of nutrients remain) and canning (20-40% of nutrients remain), dehydrating is one of the most nutritious food preservation processes. In fact, dehydrating food can actually reduce the risk of bacteria growth and other microorganisms, making your dehydrated delights both safe and nutritious.
To optimize nutritional retention, pretreating fruits with a citrus juice or vitamin C solution is a great solution. Alternatively, simply keep an eye on the temperature and drying time. Slow and steady wins the nutrient race. So, have a little patience and your dehydrated foods will thank you with delicious flavors and (mostly) preserved nutritional goodness.
How long does it take to dehydrate food in a food dehydrator?
The time it takes to dehydrate food in a food dehydrator varies depending on the type of food, the dehydrator being used, the thickness of the food slices and even the ambient humidity outside! Most foods take between 6 to 12 hours to dehydrate.
Type of food
Foods with tough skins like cherries and berries and root vegetables tend to take the longest to dehydrate, sometimes upwards of 24 hours! However, you can pretreat the food to speed up the drying process. Root vegetables dry faster after a few minutes of blanching or steaming. Tough skinned fruits dry much quicker after their skins have been sliced, poked with a fork or popped by a quick blanch.
Dehydrator Model and Brand
The type of dehydrator you use also greatly affects dehydrating times. A powerful dehydrator fan will dry out your food faster than a model that doesn’t use a fan or has a weak fan. Horizontal airflow dehydrators dry food much quicker and more evenly than vertical airflow models.
Food Slice Thickness
Always try to slice your food to be dehydrated in uniform slices, spread evenly on the drying trays with about ¼” (6mm) of space in between. Uneven slices will dry, well, unevenly! When I’ve been too lazy to take out my mandoline, I notice I have to pick off some food slices before others. Some will dry in just a few hours whereas others I might have to keep the dehydrator running overnight because they were so thick!
Outside Humidity Affecting How a Food Dehydrator Works (Yes – it’s a Thing!)
I’ll be the first to admit that I did not believe that outdoor humidity could affect dehydrating times. However, after 10+ years of dehydrating food and documenting hundreds of drying projects, I’ve realized that the % humidity outside really does impact drying times. Even from one day to the next dehydrating the same food, the dehydrating times change. For instance, I was drying many pounds of mushrooms this summer on a clear, dry day and continued to dry the second batch of the same mushrooms, same thickness the next day when a storm was predicted to be coming. The drying times almost doubled! When a storm is coming in and the humidity is rising to 70%, 80% or more, be prepared to be running your dehydrator for much longer than anticipated.
It is important to research the specific food being dehydrated to determine the appropriate temperature and time needed to remove the moisture. Generally, the following food types take about this amount of time to dry in a dehydrator:
| Food Item | Dehydrating Time (Approx.) |
| Fruits | 6 to 16 hours |
| Vegetables | 6 to 20 hours |
| Meat (Jerky) | 6 to 12 hours |
| Nuts & Seeds | 12 to 24 hours |
| Herbs | 2 to 4 hours |
Frequently Asked Questions (FAQs)
What is a food dehydrator and how does it work?
A food dehydrator is an appliance that removes moisture from food to preserve it for longer periods of time.
It works by applying low heat and a constantly blowing fan to pull moisture from the contents inside, which preserves the nutrients and flavors of the food. This process results in more shelf-stable products that take up less space.
How does a food dehydrator remove moisture from food?
A food dehydrator works by using low heat and a constantly blowing fan to remove moisture from food, resulting in more shelf-stable products. The heating element of the dehydrator evaporates moisture inside the food and the fan blows the moisture away from the food. In technical terms, this process of moisture removal is called “evaporation” and “convection.”
Fresh foods naturally contain up to 95% water but when properly dehydrated, they are left with only 5 to 15% water content. Without water, bad bacteria cannot reproduce, mold cannot grow and enzymatic processes like decomposition cannot occur. Through low temperatures and long drying times of a dehydrator, food is preserved, not cooked, and almost all of the nutrient content remains.
What types of food can be dehydrated in a food dehydrator?
Any type of low-fat food with less than 5% fat content can successfully be dehydrated in a food dehydrator and safely be put into long term storage. Almost any type of fruit, vegetable, mushroom, lean meat, lean fish, plant-based meat and grain can be dehydrated. Foods with naturally high fat content like nuts and seeds can also be dehydrated but they should always be stored in a freezer to prevent the oils from becoming rancid.
Never dehydrate fatty meats or fish with more than 5% fat content or you risk severe poisoning. Believe me, I have experienced this and I almost had to be evacuated from my hiking trip due to food poisoning and dehydration.
Also never ever dehydrate any dairy, eggs, or their derivatives as they cannot be safely home dried in a dehydrator before bad or fatal bacteria like E. coli, salmonella or botulism reproduce. These types of foods should always be purchased from commercial suppliers who use faster, safer techniques to flash freeze or rapidly spray dry dairy and eggs. High fat fruits and veggies like avocados and olives should not be dehydrated either – purchase the freeze dried versions.
Can a food dehydrator be used to make jerky?
Yes, a food dehydrator can absolutely be used to make jerky! In fact, using a food dehydrator is a popular way to make jerky at home. The process involves marinating thin slices of meat and then placing them in the dehydrator to remove moisture, resulting in a chewy and flavorful snack.
Always use lean cuts of meat, fish or plant based meat, trimming away any visible fat. Stay away from oil-based marinades as they quickly become rancid, causing off flavors and potentially even food poisoning.
Do food dehydrators use a lot of electricity?
Dehydrators actually are one of the most efficient kitchen appliances you can use to dehydrate food! Food dehydrators use a fraction (as little as 20%) of the electricity of other appliances used for dehydrating such as air fryers, ovens, and toaster ovens. Based on the current price of energy in kWh in the USA, running a 10 hour drying cycle would cost anywhere from $0.54 to $1.92. You really can’t get much more efficient than that!
How do I clean my food dehydrator?
Cleaning a food dehydrator can be done by following a few simple steps. Here’s a general guide:
1. Unplug the machine and let it cool down completely.
2. Remove the trays and liners and soak them in warm, soapy water for a few minutes.
3. Wipe down the interior and base of the dehydrator with a damp cloth or sponge.
4. Inspect and clean the fan, if necessary, using a soft-bristled brush or a can of compressed air.
5. Clean the trays and liners with a soft sponge or brush, and rinse them thoroughly with clean water.
6. Dry the trays and liners with a clean towel or let them air dry completely.
Some dehydrator trays can actually be placed in the dishwasher with a no heat drying cycle for easy cleanup. For more detailed instructions, you can refer to the specific cleaning instructions provided by the manufacturer of your dehydrator.
***Add how to clean article****
Can I use a food dehydrator to dry herbs and spices?
Yes, a food dehydrator can absolutely be used to dry herbs and spices! Dehydrators are a great tool for drying herbs because they can dry the herbs quickly without the need for sunlight or a lot of space. The temperature can be set to a low range, usually between 95 and 110°F (35 to 43°C), to gently remove moisture from the herbs without damaging their flavor or nutrients. However, it is important to research the specific herb being dehydrated to determine the appropriate temperature and time needed to remove the moisture.
Are there any safety concerns when using a food dehydrator?
While food dehydrators are generally safe to use, there are some safety concerns to keep in mind. It is always important to follow these food safety guidelines when using a food dehydrator:
1. Always wash your hands before handling food.
2. Clean your food dehydrator thoroughly between batches of food to prevent bacteria growth.
3. Use only food-grade materials in the dehydrator, such as stainless steel or BPA-free plastic.
4. Avoid cross-contamination by keeping raw meats and other foods separate from each other.
5. Store the dehydrated food in airtight containers to prevent moisture from getting in and causing spoilage.
6. According to the USDA, always cook meat first to an internal temperature of 160°F / 71°C (165°F / 74°C for poultry) before dehydrating to prevent bad bacteria growth.
7. Use a food thermometer to ensure that the temperature of the dehydrator is constant throughout the drying process to kill bacteria and other harmful microorganisms.
It is also important to read and follow the manufacturer’s instructions and safety guidelines for your specific dehydrator model.
